

Windows XP user has been fading since Microsoft has introduced Windows Vista and Windows 7 as its current operating system. But there are users who are unwillingly to shift to these newer OS they are more comfortable with the older version which offers more familiarised design and hardware performance compatibility. But some manufacturer has decide to make their hardware driver only supported for the newer OS released which their performance will be much sacrificed as the specifications are barely match.
Same goes with the Compaq Presario C738TU laptop which had been preloaded with Windows Vista or useless FreeDOS instead of the previous one, Windows XP.
HP announce that this laptop is Windows XP unsupported and they won't provide any of the XPs drivers.
But, guess what? You don't have to be worried anymore as you may run Windows XP on your laptop as you please. I will give you some tutorial on how to install Windows XP on your machine with these drivers.
1. First, you need to ensure all of your hardware specifications are met as listed in the table below.
| Product Name | C738TU |
|---|---|
| Product Number | KB156PA |
| Microprocessor | 1.60 GHz Intel Pentium dual core processor T2330 |
| Microprocessor Cache | 1 MB L2 Cache |
| Memory | 512 MB (1 x 512 MB) |
| Memory Max | Up to 2 GB |
| Video Graphics | Intel Graphics Media Accelerator X3100 |
| Video Memory | Up to 64 MB |
| Hard Drive | 120 GB (5400 rpm) |
| Multimedia Drive | SuperMulti 8X DVD±R/RW with Double Layer Support |
| Display | 15.4” WXGA High Definition BrightView Widescreen (1280 x 800) |
| Fax/Modem | High speed 56K modem |
| Network Card | Ethernet 10/100BT integrated network interface |
| Wireless Connectivity | 802.11b/g WLAN |
| Sound | Altec Lansing speakers 3D Sound Blaster Pro compatible sound 16 bit integrated |
| Keyboard | 101 key compatible |
| Pointing Device | Touch Pad with dedicated vertical and horizontal Scroll Up/Down pad |
| External Ports |
|
| Dimensions | 25.70 cm (W) x 35.70 cm (L) x 3.28 cm (min H) / 4.03 cm (max H) |
| Weight | 2.59 kg |
| Power |
|
2. You need to take note that this laptop will have a serious issue with the Audio driver if installed in IDE mode which will bring you to the BSOD screen at the end of the installation. You need to change it to AHCI mode in the BIOS configuration under the hard disk setting during the POST process.
3. After changing the hard disk setting, there is another problem. Windows XP won't recognize any of your hard disk if it is set set to AHCI unless you load the SATA driver during the installation wizard which a floppy disk is needed.
I will teach you some tricks to overcome this. Before you start your installation, you will need a blank CD and another computer. Download the nLite software install it and run it.
1. Click on here to download the nLite software.
2. Install and run nLite.
3. You will get this window for the first run.

4. Click on next.
5. Insert Windows XP 32bit installation CD (Only 32bit drivers provided from this site).
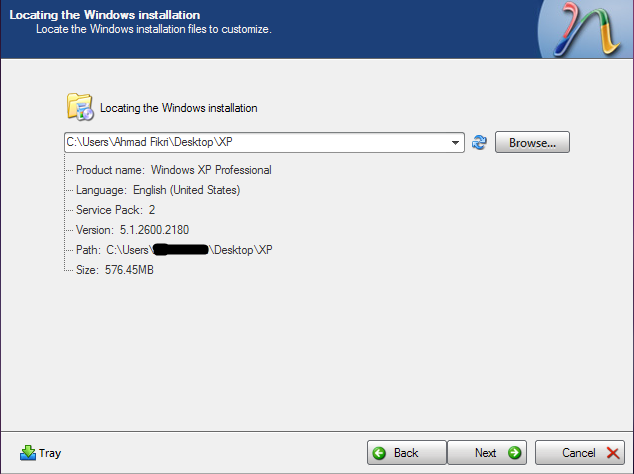
6. You will be asked the windows installation files directory in the next window.
Browse for your CD and select it. After that, you will be prompted the location to save the files.
Choose your desired directory. It can be either on the desktop or in the My Documents folder.
nLite will start copying all files on the CD and placed them into the user selected folder from previous
process. You will be given this window after the process is completed.
7. The details of the installation CD is displayed and the user may check to ensure all of the information
is correct.
8. Click on next. Ignore the preset configuration and click on next again.
9. You will be given a window as below afterward.

10. These are all of the installation configuration that you may alter as you preferred. But I'll skip this and
guide you for the main installation only.
11. Download the AHCI driver by clicking on here and save it into your computer. Extract the
downloaded driver folder.
12. Back to the nLite progress window, select the Drivers and Bootable ISO options and click on next.
13. You will be prompted with a window as below.

14. Click on Insert and select Multiple driver folder.
15. After that, choose the downloaded and extracted AHCI driver folder.
16. You will be prompted a window as below.

17. Click on the directory shown in the window (C:\Users\username\AHCI driver) and click OK.
18. After that, you will be redirected to the window as below.

19. Select Textmode driver as its default driver mode. In the Textmode integration options area, press
Ctrl+A to select all the drivers and click on OK.
20. Next, you will be asked to apply changes and start the process. Click on Yes and wait the process
to end.
21. After the process has finished, click on Next and you will be given the window as below.

22. This window is meant for the altered version of the installation CD/image creation.
23. Prepare a blank CD and pop it into your machine. In the mode option, select Burn Image and click
on Burn.
24. Wait until the process is finished. After that, click on Next and Finish. Now you have made your own
copy of Windows XP installation CD with SATA/AHCI driver.
__________________________________________________________________________________
4. After you have created your own version of Windows XP installation CD, you may start setting up the laptop operating system afterward.
5. Turn on the laptop and enter the BIOS setup configuration. Change the hard disk mode to SATA/AHCI mode from native IDE mode. Set the Optical Disk as the primary boot device and the hard disk followed as secondary boot option.
6. Load the installation CD into the laptop which you just made and restart the computer. After it restarts, enter the Windows XP installation wizard. You can start installing Windows as usual without hassles. This time, the installation wizard is able to recognise the hard disk even though it is in AHCI mode.
7. After you finish installing your copy of Windows XP on your machine, you can start loading all the drivers software to start the hardware services.
These are the drivers you might needed.
- Intel Chipset Installation Utility for ICH8 click here
- Storage (Intel Matrix Storage Manager, Realtek USB Mass Storage Device Driver, RICOH Memory Card Reader) click here
- Mobile Intel 965 Express Chipset Family Video/Graphics Driver click here
- Touchpad (ALPS Touchpad Pointing Device Driver, Synapstic Touchpad Pointing Device Driver) click here
- Conexant High-Definition Audio Driver click here
- Network (Realtek RTL8139/810x Family Fast Ethernet NIC Driver, Conexant HDAUDIO Soft Data Fax Modem with SmartCP Driver, Atheros Wireless LAN Driver) click here
- Web Camera (Cyberlink YouCam) click here
- HP Quick Launch Buttons click here
- HP Update click here
You Might Also Like:
No comments:
Post a Comment